Nginx Memcached module And PHP

I’ve seen lots of tutorials on internet explaining how set nginx to use memcached module. But, i’ve rarely seen them explaining, even the easiest one on how to populate memcached with data generated by php. When i’m getting in touch with memcached for the first time, i thought default configuration like this will be working out of the box. without touching php script. 😀

server {

	listen 80;
	server_name  example.com www.example.com;

	# ...

	location ~ \.php$ {
		set $memcached_key "kutu:$request_uri";
		memcached_pass 127.0.0.1:11211;

		default_type       text/html;
		error_page 404 405 502 = @cache_miss;
	}

	location @cache_miss {
		fastcgi_pass 127.0.0.1:9000;
		fastcgi_index index.php;
		fastcgi_param SCRIPT_FILENAME /path/to/yoursite/htdocs$fastcgi_script_name;
		include /etc/nginx/fastcgi_params;
	}

	# ...
}

Well, i was totally confused :D. so, to prevent other people misinterpret on how nginx memcached module works, i wrote simple examples, and simple explainations on how to configure nginx and populate data generated from php.

Nginx And Unix User Directories

As mentioned in the nginx wiki webiste, Nginx does not natively support user dirs, but as of 0.7.42 it can be done by using regex captures. i've tested it using this simple configuration. [text highlight="6,7,8"] server { listen 192.168.200.18:80; server_name _; access_log /var/log/nginx/nginx-userdirs-access.log main; location ~ ^/~(.+?)(/.*)?$ { alias /home/$1/public_html$2; }…

Nginx Reverse Proxying Multiple Domains Using map Module

Instead of writing multiple server blocks repeatedly in configuration, we can simplified configuration using nginx map module ie: [bash] map_hash_bucket_size 128; map $http_host $backend_servers { hostnames; default www.example.com; frontend.example2.com backend.example2.com frontend.example3.com backend.example3.com www.example.org backend.example.org } proxy_set_header X-Real-IP $remote_addr; proxy_set_header X-Forwarded-For $proxy_add_x_forwarded_for; proxy_set_header Host $http_host; server { location / { proxy_pass…

Graphing ApacheBench Results Using GnuPlot

Ab / ApacheBench is a tool commonly used to perform benchmark by many people. unfortunately, the results are displayed somewhat difficult to read by most people. but it can be tricked by turning it into a plot image. this time, I will make examples how to change the results of apachebench into a form of image plots using gnuplot. although apachebench’s report is very helpful, we need to output the data in a parse-able format. To do this we use the -g switch which will output a gnuplot-friendly tab delimited table of data.

First we need to installed gnuplot if we don’t have it yet.

$sudo yum -y install gnuplot

In this example i’ll benchmark request on static png file.

Run first webserver benchmark

$ ab -k -n 50000 -c 100 -g server1.txt http://server1/server1.png

Run second webserver benchmark

$ ab -k -n 50000 -c 100 -g server2.txt http://server2/server2.png

Example result server1.txt/server2.txt

starttime       seconds ctime   dtime   ttime   wait
Tue May 10 16:42:28 2011        1305020548      0       2       2       2
Tue May 10 16:42:28 2011        1305020548      0       3       3       2
Tue May 10 16:42:28 2011        1305020548      0       3       3       3

Memcached In A shell Using nc And echo

Some example accessing memcached from a shell using nc and echo

Storage Commands

set
add
get
gets
replace
append
prepend
cas
delete
command [key] [flags] [exptime] [bytes] [noreply]\r\n[value]\r

Parameters :

[key]			: the key of the data stored
[flags]			: 32-bit unsigned integer that the server store with the data (provided by the user), and return along the data when the item is retrieved
[exptime]		: expiration time in seconds, 0 mean no delay, if exptime is superior to 30 day, Memcached will use it as a UNIX timestamps for expiration
[bytes]			: number of bytes in the data block
[cas unique]		: unique 64-bit value of an existing entry (retrieved with gets command) to use with cas command
[noreply]		: optional parameter that inform the server to not send the reply

Memcached And PHP, Caching Mysql Query Result

I’ve been messing around with memcached and php-pecl-memcache to cache sql query result. Many web sites & applications such as Facebook, LiveJournal, Flickr, Slashdot, WikiPedia/MediaWiki, SourceForge, Digg and Twitter use memcached to enhance their performance.

Memcached (Memory Cache Daemon) was developed by the team at LiveJournal to improve performance of their social blogging site by minimizing the impact of the bottleneck caused by reading data directly from the database. Memcached is a server that caches Name Value Pairs in memory. The “Name”, or key, is limited to 250 characters, and the “Value” is limited to 1MB in size. Values can consist of data, HTML  Fragments, or binary objects; almost any type of data that can be serialized and fits in memcached can be stored.

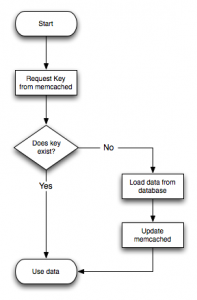
here is simple example/demonstration how to cache regular sql query

memcached flow
memcached flow

First of all, we need memcached daemon run on system

$ ps ax | grep memcached
 8955 ?        Ssl    0:00 memcached -d -p 11211 -u memcached -m 256 -c 1024 -P /var/run/memcached/memcached.pid -l 127.0.0.1

Setup simple mysql database/tables as shown bellow:

mysql-shell> CREATE DATABASE memcache;

Copy/Paste this tables schema to your mysql shell/console

CREATE TABLE memc
(
 personID int NOT NULL AUTO_INCREMENT,
 PRIMARY KEY(personID),
 FirstName varchar(15),
 LastName varchar(15),
 Age int
);
hit enter/return key

Insert some data

mysql-shell> INSERT INTO memc (FirstName, LastName, Age) VALUES('Memory', 'Cache', '100');

postfix-2.9.20110501 SRC RPM With sqlite3 Support

Since postfix-2.9. 20100617, sqlite3 support feature was added. Now, in  postfix-2.9.20110501 rpm source, i’ve included sqlite3 feature after some tweaking on Simon J. Mudd’s postfix source. Adding sqlite3 support howto can be read officially from here:

http://www.postfix.org/SQLITE_README.html

Before getting any further, i must warn you that i’m not test sqlite feature yet, since i don’t use sqlite as sql storage backend. it was compiled againts sqlite library in my system. but not tested.

rpm source can be obtain here:

postfix-2.9.20110501 (13 downloads )

Instructions:

After download the source install the source

$ rpm -Uvh  postfix-2.9.20110501.src.rpm

Nginx As Reverse Proxy IPV6 to IPV4 Website

Like many other reverse proxying mechanism, the configuration is quite simple. All we need is just website that's lived in ipv4, and Nginx with IPv6 capabled network. [text] server { listen [::]:80; # your server's public IP address server_name www.example.com; # your domain name access_log /var/log/nginx/www.example.com-access.log main; location / {…