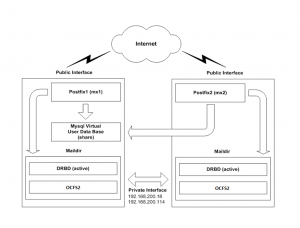
As I’ve been written on my previous post about Maildir Replication using ChironFS in postfix, I will explain step by step it can also be done by using drbd and ocfs2.
Compiling & Installing
note: if your Linux distribution is shipped with a kernel older than 2.6.33 you have to install a kernel module package and packages for the user land code. If your distribution contains a Linux-2.6.33 kernel or newer you only need to install the user land code.
In my case i have my linux distribution older than 2.6.33, so i will also compile drbd kernel module.
Download drbd source and create Binary RPMS packages
$ wget http://oss.linbit.com/drbd/8.3/drbd-8.3.10.tar.gz
$ tar xvzf drbd-8.3.10.tar.gz
$ cd drbd-8.3.10
$ ./configure --enable-spec --with-km
$ cp ../drbd*.tar.gz `rpm -E %_sourcedir`
$ rpmbuild -bb drbd.spec
$ rpmbuild -bb drbd-km.spec
$ sudo rpm -ivh /path/to/RPMS/drbd-*
I’ll be using loop files for this setup since I don’t have access to raw partitions.
but if you have raw block device available you can subtitute this part:
resource r0 { meta-disk internal; device /dev/drbd0; disk /dev/loop0;
Into:
resource r0 {
	meta-disk internal;
	device /dev/drbd0;
	disk /dev/sdxx;
sdxx can be sda1, sdb1 sdb2 or what ever your raw disk device called
# dd if=/dev/zero of=/drbd-postfix.img bs=1M count=5000
# losetup /dev/loop0 /drbd-postfix.img
Place this DRBD resource file in /etc/drbd.d/r0.res. Be sure to adjust the server names and IP addresses for your servers.
resource r0 {
	meta-disk internal;
	device /dev/drbd0;
	disk /dev/loop0;

	syncer { rate 1000M; }
        net {
                allow-two-primaries;
                after-sb-0pri discard-zero-changes;
                after-sb-1pri discard-secondary;
                after-sb-2pri disconnect;
        }
	startup { become-primary-on both; }

	on postfix1 { address 192.168.200.18:7789; }
	on postfix2 { address 192.168.200.114:7789; }
}
important: Do this only with a clustered filesystem. If you do this with anon-clustered filesystem like ext2/ext3/ext4 or reiserfs, you will havedata corruption.
Now we can create the volume and start DRBD:
# drbdadm create-md r0
# /etc/init.d/drbd start
# chkconfig drbd on
Run the following command on the primary node only:
# drbdsetup /dev/drbd0 primary -o
If nothings gone wrong you should see something like this when you run cat /proc/drbd on both node
postfix1:
[root@postfix1] # cat /proc/drbd
version: 8.3.10 (api:88/proto:86-96)
GIT-hash: 5c0b0469666682443d4785d90a2c603378f9017b build by postfix1, 2011-06-16 15:40:42

 1: cs:Connected ro:Primary/Primary ds:UpToDate/UpToDate C r-----
    ns:18 nr:22 dw:40 dr:1068 al:2 bm:3 lo:0 pe:0 ua:0 ap:0 ep:1 wo:b oos:0
postfix2:
[root@postfix2]# cat /proc/drbd
version: 8.3.10 (api:88/proto:86-96)
GIT-hash: 5c0b0469666682443d4785d90a2c603378f9017b build by postfix2, 2011-06-16 20:25:22

 1: cs:Connected ro:Primary/Primary ds:UpToDate/UpToDate C r-----
    ns:27 nr:91 dw:119 dr:1817 al:4 bm:3 lo:0 pe:0 ua:0 ap:0 ep:1 wo:b oos:0
If the secondary node not a primary yet, make it a primary node as well:
# drbdadm disconnect r0
# drbdadm primary r0
# drbdadm connect r0
If everythings run as expected you will see these on both node
[root@postfix1]# drbdadm role r0
Primary/Primary
[root@postfix2]# drbdadm role r0
Primary/Primary
We’re now ready to configuring OCFS2 part. Only one package is needed:
# yum -y install ocfs2-tools
Create the /etc/ocfs2 directory and place the following configuration in /etc/ocfs2/cluster.conf
cluster:
	node_count = 2
	name = postfix

node:
	ip_port = 7788
	ip_address = 192.168.200.18
	number = 1
	name = postfix1
	cluster = postfix

node:
	ip_port = 7788
	ip_address = 192.168.200.114
	number = 2
	name = postfix2
	cluster = postfix
Now it’s time to configure OCFS2. Run service o2cb configure and follow the prompts. Use the defaults for
all of the responses except for two questions:
- Answer “y” to “Load O2CB driver on boot”
- Answer “postfix” to “Cluster to start on boot”
Start OCFS2 and enable it at boot up:
# chkconfig o2cb on
# chkconfig ocfs2 on
# /etc/init.d/o2cb start
# /etc/init.d/ocfs2 start
Create an OCFS2 partition on the primary node only:
# mkfs.ocfs2 -L "postfix" /dev/drbd0
On both node add this line to /etc/fstab
/dev/drbd0 /mnt/postfix ocfs2 noauto,noatime 0 0
On both node run this commands
# mkdir /mnt/postfix
# chown -R postfix:postfix /mnt/postfix
# mount /dev/drbd0
At this point, you should be all done with drbd and ocfs2 part. If you want to test OCFS2, copy a file into your /mnt/postfix on one node and check if it appears on the other node. If you remove it, it should be gone instantly on both nodes.
postfix1
# maildirmake /mnt/postfix/test
# ls /mnt/postfix/test
cur  new  tmp
postfix2, we will see same maildir structure as postfix1
# ls /mnt/postfix/test
cur  new  tmp
Now, on postfix part it’s just add/modify this line
virtual_mailbox_base = /mnt/postfix
One of possible schemes:

DNS part
example.com.                 MX      10 postfix1.example.com.
example.com.                 MX      10 postfix2.example.com.
postfix1             IN      A       202.xxx.xxx.1
postfix1             IN      A       202.xxx.xxx.2
postfix1.example.com and postfix2.example.com not behave like a primary and backup mx commonly used by people. but they have exactly the same configuration, every email received on each server will be forwarded directly to maildir.
Mysql part
Mysql server could be on a different server, separated from both postfix server. In this scheme I described the mysql server resides on a server postfix1, and listen on the private interface ip address, so postfix2 can also access the mysql server.
On both postfix1 and postfix2 mysql_virtual_mailbox_maps.cf
user = user
password = password
hosts = 192.168.200.18
dbname = postfixdb
query = SELECT maildir FROM mailbox WHERE username='%s' AND active = 1
Complete virtual mailbox setting on both nodes
virtual_mailbox_maps = mysql:/etc/postfix/mysql_virtual_mailbox_maps.cf
virtual_mailbox_base = /mnt/postfix
As usual, Use extreme caution if you find yourself in this scenario.
References:
- http://www.drbd.org/
- http://www.postfix.org
- http://oss.oracle.com/projects/ocfs2/
- http://rackerhacker.com/2011/02/13/dual-primary-drbd-with-ocfs2/
